June 9, 2013
Searching Outlook by Folder Name
Those of us who’ve been using MS Outlook for several years or more have by now likely amassed a rather sizable and deep hierarchy of private folders. Contained in a .PST file, these folders aren’t searchable by name, as Outlook doesn’t offer such a facility as part of its mechanism that lets you search for filed emails. While you can search for emails based on a variety of criteria, if any of those items returned as a result of an Advanced Find operation is in a deeply nested folder, you’re then stuck with the task of figuring out where in your folder hierarchy to dig in order to find that sub-folder.
Fortunately, this limitation can be circumvented by running a VB (Visual Basic) Office macro, available through the “VBOffice” web site. Prepared by a fellow named Michael Bauer back in 2010, this macro contains all the code Outlook needs in order to display an elegantly simple search dialog where you specify a searched-for folder name.
For those familiar with MS Office automation and development, simply copy the code into a module, assign the module a logical name, and once you’re back in the main Outlook UI, run the macro.
The procedure below is written for those interested in becoming more familiar with Office automation. Following these steps will enable you to save this macro to Outlook, and run it at will.
1. Hold down the Alt key and press F11 to open the VGA development window.
2. In the Project pane (in upper-left portion of the UI), select Module > right click > Insert > Module.
3. In the VbaProject.OTM pane (toward center-screen), copy over the code from the link above.

4. In the Properties pane (in lower-left portion of the UI), rename the module, e.g. FindPrivateFolder.

5. Toggle back to the main Outlook UI and click the Customer Quick Access Toolbar menu.
6. Choose More Commands > Customize Ribbon.

7. Under Customize the Ribbon: Main Tabs, select the Developer checkbox and click OK.

8. In the Developer tab, click Code > Macros, and run the macro you just created by selecting it.

9. In Outlook Options, select the Customize Ribbon > Choose Commands from: Macros.

10. Under Customize the Ribbon: Main Tabs, choose Folder > New Group.

11. Name the command, e.g. Folder Search.
12. Click Add to attach the macro to the newly created group, and click OK.
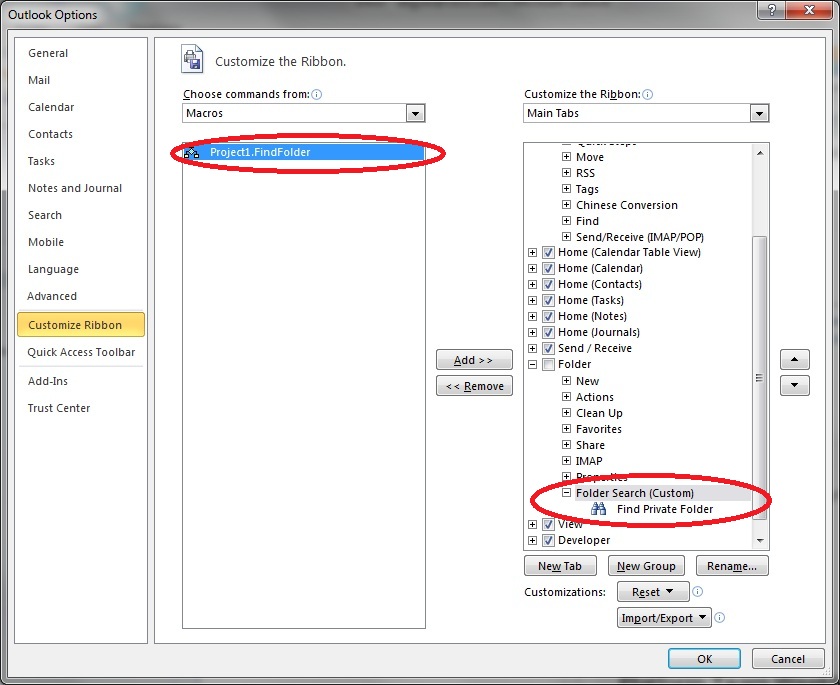
13. Rename the command, i.e. to make it shorter and more intuitive; and if you wish, associate it with an icon.


You must be logged in to post a comment.